Sunday, October 25, 2015

Mass - Sean Hyson (2015)


First Issue

Latest Issue


WINTER MASS WORKOUTS
by
Sean Hyson (2015)

 Forget about abs and calves. Use these cold months to add size and strength with the most effective exercises known to man.

RELAX. Abs season is over. You don't have to meticulously count every gram of carbs and fat anymore, because even if you do keep your abs over the next few months, no one but your girlfriend will have a chance to see them. It's wintertime, and for most of the country that means a return to long sleeve shirts and pants, holiday parties and comfort foods -- all things that will conspire to rob you of your definition and steadily expand your waistline.

And rather than fight it, we say EMBRACE IT. December through March is the perfect time to shift your training to a powerbuilding split focused on putting up big numbers and adding prime beef to your frame so that when spring comes back, you'll only need a few weeks of dieting to shed your "winter coat" and reveal the dense muscle beneath it.

To this end, we polled three of our favorite experts - 

Joe DeFranco, a strength coach to several pro football players


CJ Murphy, a strength coach, powerlifter and all-around badass


and Mike O'Hearn, a bodybuilder, powerlifter and former American Gladiator


to get their picks for the best muscle- and strength-building exercises, period. We then mixed as many of them as we could together to fashion a damn fine mass-gain program that will have you setting new PRs -- safely -- while pumping up the muscles that show behind even the ugliest Xmas sweater: the traps, shoulders, chest, and arms. We bet that you will enjoy this routine so much you'll wish it stayed winter forever. (Almost.)


Directions

Perform each workout (Days I, II, III, and IV) once per week. Exercises marked with an asterisk (*) indicate they should be rotated with similar movements each week. For example, on the first leg day, you can do the classic back squat one week, then a box squat the next, and a pause squat in Week 3. (If you have access to special bars, like a safety squat bar, you can use these as well for more variety.) On upper body days, you can rotate among the bench press, incline bench press, and floor press, just as examples. 

On the second leg day, you can opt for any variety of deadlift you like (such as trap bar, sumo deadlift, or conventional deadlift); you can also change the height of the bar, choosing to do deficit deadlifts (where you stand on a platform to increase the range of motion), or rack pulls (where you rest the bar on a rack or blocks just below knee level to shorten the range of motion). Cycle the lifts as you like or need to, depending on recovery and how your lower back and shoulders feel.  

On all of the main lifts (squat, bench press, deadlift) and their variants that you cycle, you'll work up to a one- to 10-rep max. Begin with an empty bar and gradually add weight until you reach a load that cuts you off at a certain number of reps within that range. You can shoot for a 10-rep max one week on one lift and then an 8-rep max on another lift the next week. You can work down to a one-rep max over time or play it safe and stay within 5 to 8 reps. It's up to you and how far you want to push your strength gains. Just be aware that repeatedly training very heavy (5-rep maxes or heavier) wil be stressful and will require occasional deloads. Once you reach the load that allows you the number of reps you're shooting for but no more, you're done with that lift for the day.

Blog author's note: While using this layout I found the list of Big Three Lift variations included here to be very useful:

http://www.syattfitness.com/westside-barbell/the-westside-barbell-conjugate-method-a-guide-to-variation/

Note that SOME OF THE EXERCISES ARE ALTERNATED. This means you'll do one set of the first lift, REST, then do one set of the second lift, REST AGAIN, and repeat until all the sets are completed.


DAY ONE: LEGS AND CORE

Lying Leg Curl, 3 sets of 15 reps.
Set up the machine so that the foot pad rests just above your ankles as you do the reps. Squeeze each rep at the top contracted position for 1 to 2 seconds.

* Squat Variant *, as many sets as needed, one to 10 reps.

Keystone Deadlift, 2 sets of 6-8 reps.
Hold the bar at arms' at your thighs. Push your hips back and lower your torso until the bar reaches the top of your knees. It is similar to a Romanian deadlift, only with a shorter range of motion, and it's also easier on the lower back.

Bulgarian Split Squat, 3 sets of 8 one-and-one-half reps each leg.
Hold a dumbbell in each hand and stand lunge length in front of a bench. Rest the top of one foot on the bench behind you. Bend both knees and lower your body until your rear knee nearly touches the floor. Keep your torso upright. To perform one-and-one-half reps lower your body into the bottom position and then come up halfway. Go back down and then come up to the start position. That's one one-and-one-half rep.

Ab Wheel Rollout, 3 sets of 8-15 reps.


DAY TWO: CHEST, BACK, SHOULDERS, TRICEPS

 Alternating Incline Dumbbell Press, 3 sets of 12-15 reps each side.

* Bench Press *, as many sets as needed, one to 10 reps, alternated with
Chest Supported Row, 4 sets of 8-12 reps.

Lateral Raise, 3 sets of 10-12 reps.

Incline Tate Press, 3 sets of 15 reps.
Set a bench to an incline and lie back with a pair of dumbbells locked out overhead. Flare your elbows out and lower the weights in toward your chest.


DAY THREE: LEGS, TRAPS, CORE

Glute Ham Raise, 3 sets of 10-12 reps.

Front Squat, 2 sets of 8 reps.

* Deadlift *, as many sets as needed, one to 10 reps.

Dumbbell Shrug, 3 sets of 12-15 reps.

Back Extension, As many sets as needed, 50 total reps.

One-Arm Farmer's Walk, 2 sets, as far as possible.
Hold a heavy dumbbell in one hand and walk as far as you can while keeping your torso upright and straight. Alternate sides each set. 


DAY FOUR: CHEST, SHOULDERS, BACK, ARMS

Seated Dumbbell Overhead Press, 3 sets of 10-12 reps, alternated with
Pullup, 3 sets of as many reps as possible.
Grab the bar with a wide grip. Keep your back flat and initiate the pull by retracting your shoulder blades. Initiate each rep from a dead hang; don't use momentum.

Cable Flye, 3 sets of 15 reps, alternated with
One-Arm Dumbbell Row, 3 sets of 10-12 reps.

Face-Pull, 3 sets of 15-20 reps.
Attach a rope handle to the top pulley of a cable station and grasp an end with palms facing each other. Pull the rope to your forehead while flaring your elbows out until your back is fully contracted. 

Concentration Curl, 4 sets of 8 one-and-one-half reps.
Sit on a bench with a dumbbell in one hand and brace the back of your arm against the inside of your thigh. Perform a strict curl movement and then lower the weight one half of the way back down. Curl it all the way up again and then lower it fully. That's one one-and-one-half rep.

Band Pushdown, as many sets as needed to complete 100 total reps.
Attach a band to the top of a power rack or other sturdy surface and grab an end in each hand. Perform pushdowns as you would at a cable station, but do as many reps as needed to reach 100 reps, resting along the way.


Saturday, October 24, 2015

Deadlift Assistance Work - John Kuc (1984)


Here is the companion Bench Press Assistance Article from John Kuc:
http://ditillo2.blogspot.ca/2008/11/bench-press-assisstance-john-kuc.html


Deadlift Assistance Work
by 
John Kuc (PLUSA May 1984)

Assistance work can be extremely beneficial to a lifer. At times it is the only way to get over a sticking point and begin making progress again. One of the major faults I have found with many assistance programs is that the lifter does not use the correct ones. An individual hears that one of the top lifters uses a certain type of assistance exercise, so he begins to use it. What this individual fails to see is that assistance exercises should be tailored to his own weak points. Different exercises affect different areas of a lift.

Before adopting an assistance exercise program you must honestly evaluate your individual strong and weak points. It is not always easy to be objective about yourself. Consult your training partners and coach to help you with this evaluation.

In this narrative we well review deadlift assistance work. Deadlift assistance exercises are always worked with your deadlift routine. Your deadlift routine may hit a brick wall during the months you devote to assistance work. This is normal. You cannot work two heavy deadlift programs at the same time and make progress. The only way you could do that is if you were heavy into drugs, and I am 100% opposed to that.

Assistance work is temporary and it is done to improve your deadlift, not as a lift in itself. Lighten up on your regular deadlifts. For now put your assistance work first and regular deadlifts second.

After you complete your deadlift warmup routine warmup with the assistance work; then go into the exercises heavy. Assistance work takes time to show results. Do not expect instant results; they don't happen. Assistance work is long term. When you schedule assistance work give yourself six months from the day of your first assistance exercise to any contest you want to enter. You will need three solid months of assistance work and three good months to get your deadlift in order without the assistance work.

As I stated before you must evaluate your individual needs before adopting an assistance program. Te deadlift can be divided into three parts and one intangible.

1) The start off the floor to just below the knees.

2) The transition or mid point - just below the knees to slightly above.

3) The finish - above the knees to lockout.

4) The grip - if you cannot hold the weight you are not going to complete the lift.

Break your deadlift into three parts and decide where you have your problem. Once you have determined this you can apply the necessary assistance exercises to improve your weak points.

The following are the assistance exercises you can use and the parts of the deadlift they work.


Power Rack:

Applies to items 1, 2, 3, 4. The nice feature of the power rack is that any portion of the deadlift can be worked. Set your bar at the desired location and begin.

Recommended Reps - 5 warmup; 4 warmup; 3 sets of 3 heavy.


Lockouts:

Applies to items 2, 3, 4. Done in the power rack or off the blocks. Lockouts can be done from any point in the deadlift to lockout. They are mostly done from just below the knee to lockout and from just above the knee to lockout. Lockouts help any sticking points in the second and third parts of the deadlift. This is one of the most popular and effective assistance exercises for the deadlift. 

Recommended Reps - 5 warmup; 4 warmup; 3 heavy; 3 heavy; 3 heavy.


Isometric Pulls:

Applies to items 2 and 3. Done in the power rack. Any part of the deadlift can be worked with isometric pulls. 

Recommended Reps - 2 pulls of 10 seconds duration. DO NOT hold your breath during the entire 10 seconds of each pull.


Complete Stop Deadlifts:

Applies to items 1, 2, 3, 4. These are nothing more than repetition deadlifts. The only difference comes in completely letting go of the bar between each repetition. This is one of the toughest assistance exercises for the deadlift. Complete stop deadlifts work every part of the deadlift and develop a vice like grip. 

Recommended Reps - 3 sets of 3 or 3 sets of 4.


Shrugs

Applies to items 3 and 4. Shrugs are done in the power rack or off the end of a bench. The assist in the third part of the deadlift, especially the last few inches of movement before lockout. Shrugs improve grip strength too. 

Recommended Reps - 4 sets of 6 reps twice a week.


Upright Rows:

Applies to items 3 and 4. These improve the medium and upper range of the third part of the deadlift. This exercise is also a good grip builder.

Recommended Reps - 4 sets of 6 - 8 reps twice a week.


Good Mornings

Applies to items 1, 2, 3. This is a good exercise for increasing power throughout the entire range of the deadlift. This exercise is not for everyone. In some people the good morning will cause back pain and lead to lower back injury. The best way to do good mornings is to start very light and work up very slowly. Be aware of any soreness which might develop. If the good morning is compatible with you, there is the potential of gradually handling very heavy weights and substantially increasing your lower back power. In other words, it's a good exercise for the right people.

Recommended Reps -
Initial Program: 10 warmup; 8 warmup; 5 sets of 8
Heavy Program: 10 warmup; 8 warmup; 5 sets of 5


Power Clean:

Applies to items 1 and 4. The power clean is a good movement for developing a powerful start and strong gripping power. The power clean has more applications in Olympic lifting than in powerlifting, however. There are exercises giving a better return of strength in relation to the amount of time, energy and number of repetitions put in.

Recommended Reps - 10 warmup; 8 warmup; 5 warmup; 5 warmup; 3 warmup; 3 warmup; 3 sets of 3 reps.


Bentover Rows:

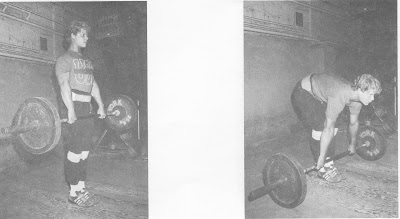
Applies to items 1 and 4. This is a lat building exercise that develops god off-the-floor power. Bentover rows also build gripping power and help prevent lat injuries caused by deadlifting.

Recommended Reps - 4 sets of 6.


Lat Bar Rows:

Applies to items 1 and 4. These rows are a lat building movement having the same effect as bentover rows. You can handle heavier weight with lat bar rows, though.

Recommended Reps - 4 sets of 6.


Dumbbell Rows:

Applies to items 1, 2, and 4. This is the best of the rowing movements for helping the deadlift. Dumbbell rows develop good initial pull and off-the-floor power. Dumbbell rows are useful in the transition part of the deadlift and develop strong gripping power.

Recommended Reps - 6 sets of 8.


Pulldowns and Pullups:

Applies to items 1 and 4. Both of these are similar in movement and function. These exercises help the initial pull of the deadlift. This exercise is not, however, a very effective power builder because heavy weights cannot be managed in either lift.

Recommended Reps - 3 x 8.


Curling Movement:

Applies to items 1, 3, and 4. This exercise builds a stronger link between the weight and the body. Strong arms add confidence to a lifter by giving a solid feeling of legs, arms, and body being one. Strong biceps enhance the pulling power of your lats, increased strength in the biceps assists the first and third part of the deadlift pull. The best reason for bicep work is to decrease the possibility of strain to the bicep, or the chance the bicep might tear off the bone during a deadlift.

Recommended Reps - 6 sets of 6, heavy.


Stiff-Legged Deadlift:

Applies to items 1, 2, 3, and 4. This exercise is a tough one to stick out. The reason is probably that they make us deadlift without the use of our legs. A feeling of frustration builds when the pain and seemingly slow progress are inevitably encountered. The stiff-legged deadlift is one of the best deadlift assistance exercises. It works the entire range of the deadlift equally from power starts to positive lockouts.

Recommended Reps - 10 warmup; 8 warmup; 6 warmup; 6 sets of 5 reps.


Deadlifts Off the Blocks (deficit deadlifts):

Applies to item 1. This is a tremendous method of improving the start off the floor. Stand on a block that is high enough to bring the top of your feet within an inch-and-a-half of the bar. Do not do stiff-legged deadlifts here. Perform the regular deadlift and use your regular stance. This is an effective exercise but it is easy to burn out on.

Recommended Reps - 4 sets of 5 once a week.


The number of assistance exercises you use will be determined by your needs and the type you pick. Doing lockouts and complete stop deadlifts at the same time would be too much. Lockouts and a rowing movement could be handled, however.

Carefully evaluate your needs and choose the exercises best suited to your needs.  


Sunday, October 18, 2015

Belt Squats - Walter J. Sword (1984)


Belt Squat Article (Translated from Italian to English poorly):


BELT SQUATS 
by
Walter L. Sword (from PLUSA March 1984)

The search for the BEST SQUAT ACCESSORY EXERCISE that does not overwork the lower back is over. BELT SQUATS are the exercise!

Accessory exercises are supplementary movements implemented in a training program to compliment and enhance performance of a major lift. In competitive powerlifting, the choice of accessory exercises is important to the success of the three powerlifts.

The most effective accessory exercises are those which most closely resemble the actual lifts. The list of current accessory exercises for improving squatting ability include: front squats, hack squats, leg presses, leg extensions, leg curls, etc. The shortcomings of most squat accessory exercises are that either the exercise is not specific enough to the squatting movement or the exercise overworks the lower back. Belt squats have proven to me to be the MOST SPECIFIC squatting accessory exercise WITHOUT OVERWORKING the lower back.

A special belt is needed to do belt squats. The belt must be long enough to fit around the waist, rest on the hips, and hang between the legs.

Belt squat procedure and performance is simple. Set up two benches or boxes spaced apart the desired width of the squat stance. Place a sturdy chair between the benches and put weights on the chair. Stand on the two benches and position the weight around the waist, resting on the hips and hanging between the legs. Attach weights to the belt and stand up. Remover the chair and begin squatting. When the desired number of reps are reached, replace the chair in between the two benches and unfasten the weights.

The arms are very important in balancing the body as the movement is very awkward at first. Spotting is done from the sides by placing a hand under the hamstring and a hand under the chest. Spotters should watch for "flying elbows" as the exerciser tries to balance himself. When the balance is developed, a wooden stick may be placed on the shoulders to simulate a squat bar.

Belt squats appear to be best implemented on the light squat day, opposite the heavy squat day. the best results seem to occur when performed with moderate to light weights and done for repetitions in the 10 - 20 range. A lifting suit can be worn but is not recommended and loose wraps are worn as it appears best not to depend on these training aids.

An interesting variation is incline/decline belt squats, where the squats are done on an incline of decline surface by setting two situp boards (or planks of wood) in a power rack. Incline belt squats tend to emphasize the hips and hamstrings; decline belt squats tend to emphasize the lower quadriceps. Flat belt squats tend to emphasize the hips, hamstrings, and quadriceps evenly.

In summary, there are some important reasons for doing belt squats. Belt squats are more specific to the squatting movement than most accessory exercises. Belt squats build neuromuscular coordination and balance, which machines fail to do. Belt squats do not involve the lower back significantly, thereby reducing the chance of overworking the erectors.

Belt squats were introduced to me by Louie Simmons, a top 50 all time ever powerlifter in the 198 and 220 pound class, and one of the top powerlifting minds around.

Belt squats have contributed to my performance of a 630 squat at 181 and my training partner Garry Benford's squat of 640 at 198. Belt squats are by far the best squatting accessory exercise I have ever seen.


Saturday, October 17, 2015

Variable Cycle Rotation - Scott T. Kroculick (1989)


The Soft Cover edition of Bill Pearl’s "Keys to the INNER Universe" is back in print, revised, and available at Amazon.com. This revised edition includes updated exercise images and degree of difficulty indicator is now included.

[Note: Adding unilateral leg and arm variations to Mr. Pearl's listed exercises will add even more variety, as will adding the variety of the various machines now available.]


Variable Cycle Rotation: 
How to Overcome Plateaus With Exercise Variation
by 
Scott T. Kroculick (1989)


Have you ever noticed that almost every time you try a new exercise and do it right you get sore? Then you go to your favorite exercise, the one you've been doing for years, and you feel nothing. This phenomenon happens all too often. When you reach a point with one particular exercise or training routine where you can go no further, the VCR (variable cycle rotation) approach can help you overcome this sticking point.

The VCR method has been designed specifically to combat training plateaus. Implementation of this system may help the athlete overcome the "staleness" problems encountered with many of the current training routines being used. This method borrows from the research done at the Bulgarian Institute for Higher Physical Education and Sport Instruction. The simplest use of the VCR method is to change the exercise stimulus every two to four weeks to "force" a muscular adaptation. This principle is called Specific Adaptation to Imposed Demand (SAID).

It is a well-documented fact that strength increases dramatically when you begin a new exercise. This is due in part to the adaptation of your neuromuscular system to the newly imposed stress. When a new stress is placed on muscle tissue and the corresponding motor nerves, your system reacts by increasing the efficiency of its electrical system. The increased electrical firing rate of the nervous system allows more muscle tissue to contract when this new stress is encountered again. A second reaction to this new stress (a new exercise) is tissue growth, also known as hypertrophy.

The current myth -- that muscle tissue is "torn down" during exercise and "built up" again during rest -- is simply not true. It is theorized that exercised muscle demands nitrogen to create the protein that makes larger muscle fibers. To keep making this progress, continual change is necessary. When the muscle finishes an adaptation to a new exercise (about two to four weeks), it is generally believed that continuation of this exercise will result in no further change or a decreased rate of change.

Changing an exercise every couple of weeks will cause positive, adaptive changes in the muscle being exercised. The VCR method provides for continuous, adaptive change.

With this approach you select three to five exercises from a pool of exercises for each particular bodypart [and here we don't really need to be reminded that muscle 'groups' and muscle ('actions') can be considered as very similar, as in 'back' and ('pull'); 'chest' and ('horizontal push')' 'legs' and ('squat')]

Do three to five exercises for larger bodyparts (legs, chest, back), and two to four exercises for smaller bodyparts (shoulders, arms, calves).

Perform three to five sets or each exercise for each bodypart, keeping in mind that overworking with this method is a distinct possibility.

After training with these exercises for a cycle of two to four weeks, select new exercises from the pool (Table One gives some examples) and perform them for the next cycle. The exercises should be selected wisely and balanced between agonist/antagonist; for example, three quadriceps exercises should be balanced by at least two hamstring exercises.

During a mesocycle (approximately three weeks) follow a consistent repetition scheme (see Table 1). Beginning with the next mesocycle, change the repetition scheme to further force adaptation from the muscle tissue.

Remember, exercise selection during this period is entirely up to you. Try not to do the same thing for more than four weeks, and pick entirely different exercises for the next microcycle, even if the change is simply the use of a different machine or a switch from a barbell to dumbbells. At the completion of this macrocycle you can either peak, or repeat the cycle in its entirety.

Remember, each athlete is different and so will have special considerations in developing a program. Those who recover quickly might try shorter mesocycles with more sets and more exercises. Those who recover slower might try longer microcycles to allow more time for adaptation.


 Table One: Cycles

Here is a sample eight month macrocycle, broken down into meso- micro-cycles.
You can come up with many other set/rep schemes over time, going from single rep sets
all the way to 100-rep sets.


Mesocycle 1 - 3 Months - Endurance - 12 - 15 reps.

Microcycle One - 4 weeks
Microcycle Two - 2 weeks
Microcycle Three - 4 weeks
Microcycle Four - 2 weeks


Mesocycle 2 - 3 Months - Hypertrophy - 8 - 10 reps.

Microcycle One - 4 weeks
Microcycle Two - 2 weeks
Microcycle Three - 4 weeks
Microcycle Four - 2 weeks


Mesocycle 3 - 2 Months - Strength - 6 - 8 reps.

Microcycle One - 2 weeks
Microcycle Two - 2 weeks
Microcycle Three - 2 weeks
Microcycle Four - 2 weeks


 Table One: The Pool of Execises


[Can be done one or two limb, with barbell, dumbbell, machine, cables, kettlebells, etc.]

 Legs: 

Squats -
Narrow Stance, high bar
Wide Stance, low bar
Front Squats
Smith Machine Squats
Hack Squats
Sissy Squats
Partial Squats
Isokinetic Squats
Explosive Jump Squats
Leg Presses
Lunges
Trap Bar Deadlifts
Leg Extensions
Leg Curls
Standing Leg Curls
Stiff-legged Deadlifts
Romanian Deadlifts
Glute Ham Raise
Etc.


Chest:

Bench Press - narrow, wide, medium grip
Cambered Bar bench press
Bench Flyes
Incline Press
Incline Flye
Cable Crossovers
Pec Deck
Decline Press
Decline Flye
Dips
Etc.


Back:

Chins
Pulldowns - behind neck, front of neck, reverse grip, parallel grip
Cable Row
Machine Row
Bentover Row
One Arm DB Row
Two Arm DB Row
Power Clean, Clean, Snatch
Straight Arm Pulldown
Pullover
Machine Pullover
T-Bar Row
End of Bar Row
Off-Loaded BB Row
Hyperextension
Reverse Hyperextension
Good Morning
Regular Deadlift
Etc. 


Shoulders:

Press - behind neck, seated, standing, kneeling, sitting on floor, standing on head on acid
front of neck, reverse grip, parallel grip, military, push . . .
Lateral Raise - side, front, rear, machine, cable


Traps:

Upright Row
Shrug - upright, bentover, behind back


Biceps:

Barbell Curl - standing, seated, strict, cheat
Dumbbell Curl, standing, seated, incline, ditto above type of things friendo
Preacher Curl
Hammer Curl
Reverse Curl
Concentration Curl
Etc.


Triceps:

Close Grip Bench Press
Reverse Grip Bench Press
Pushdown - narrow grip, wide grip, parallel grip, thick bar, rope, reverse grip
Triceps Extension - Standing, seated, lying, incline, decline, lowering to different areas,
Kickback
Dips
Bench Dips
Etc.


Calves:

Standing Calf Raise
Seated Calf Raise
Toe Press on Leg Press
Donkey Raise
Tib Raise
Etc.


Forearms:

Wrist Curls
Reverse Wrist Curls
Isometric Squeezes
Grippers
Dumbbell Rockers
Wrist Roller
Etc.

These are partial lists. You will, over time, come up with all kinds of exercise variations.
The good, the bad, as well as the ugly and inexcusable.
We all go there now and then!


Sunday, October 11, 2015

U.S. Weightlifting Federation Coaching Manual: Technique Part Five


TEACHING THE SNATCH

Eastern European researchers have found it more advisable to teach the Snatch first for two reasons. First, it is slightly more complicated than the Clean and Jerk. Second, it is a more explosive movement and it's crucial to teach beginners the proper rhythm of the lift from the start. They feel that if the athlete starts with the Clean, his body won't learn how to react with the speed needed in the Snatch. The method we'll use to teach is a top-down approach. Once the lifter has established a good starting foot position, the rest of his early work will be done from the hang.


One: The Starting Position


The starting position is learned first so the athlete knows where to place his feet and how to keep the lower back rigid. For full technical details, review here:

http://ditillo2.blogspot.ca/2015/10/us-weightlifting-federation-coaching_1.html


A) The Grip -

To determine the width of grip, use one of the methods shown in Section II (link above).


B) The Foot Position -

1. Stand over the bar, place the feet under the bar so that the bar crosses the balls of the feet (MPJ).

2. The feet should be a little less than shoulder width apart. A good way to find the strongest position quickly is to close the eyes and put the feet in the position that would be used in vertical or standing long jumping.


C) The Body Position -

1. The position of the back is critical in making sure that the lifter is in the proper position. The best position for the back is when it is flat or slightly arched in the small of the back. Many young lifters don't know how to arch their backs and must be taught. The simplest way is to stand up straight and to raise the chest up and out. This will place the back in the proper position. The lifter must then work to hold this position throughout the lift.

2. Bend at the knees and waist while maintaining a tight back position. Grasp the bar with the Snatch grip. Find a comfortable position. The head should be in a relaxed position, the back flat or slightly arched. The bodyweight should be nearer to the front of the foot. The shoulders should be over or ahead of the bar. DO NOT sit on the heels or round the back.

KEY WORDS:
1. GOOD BACK POSITION. 2. TIGHT BACK. 3. SIT TO BAR -- DON'T BEND OVER TO IT. 4. SHOULDERS AHEAD OF THE BAR. 5. WEIGHT ON FULL FOOT. 6. HOLD WATER IN THE SMALL OF THE BACK. 7. CHEST OUT. 8. WIGGLE TOES.

D) Practice:
Assume this position at least 10 times. When a good position is obtained, mark the foot position on the floor with chalk.


Two: The Overhead Position


 This position is learned by doing the wide grip Press Behind the Neck. If you haven't been doing this exercise, refer to its description in the basic weight training exercises.    


It's also recommended that you introduce a small leg kick into the exercise, making it a push press. This will teach the lifter to finish with a snappy arm lock. 

KEY WORDS:
1. TIGHT UPPER BACK. 2. SNAPPY ARM LOCK. 3. PUSH UP AND OUT. 4. STRETCH THE BAR. 5. REACH UP. 6. REACH WITH THE SHOULDERS. 7. HEAD BETWEEN SHOULDERS.


Practice: 
Do this exercise in training until the position is mastered. 


Three: The Low Position (Overhead Squat)


This exercise is included here to determine how wide the feet should be popped to the sides in the Snatch. It can be done with weight or with an empty bar. 


A) The Starting Position - 

1. Stand with the bar held overhead with the Snatch grip.

2. Place the feet in a position normally used for the Squat.


B) The Exercise - 

1. Squat down, by trying to put the hips between the heels.

2. Keep the head up and keep pushing on the bar. 

3. Try to keep the feet flat on the floor.

4. Avoid very wide foot spacing. Try to get lower by putting the hips between the heels not by leaning over at the waist.

KEY WORDS: 1. PUSH UP AND OUT. 2. BACK TIGHT. 3 HEAD UP. 4. HIPS BETWEEN HEELS. 5. CHEST UP.


C) Practice - 

Assume this position 5 to 10 times. When a good position is obtained, mark this foot position on the floor with chalk. 


Four: Footwork Exercise


 This exercise teaches the athlete to move his feet properly from the starting position to the squatting position. Each athlete should know where his feet should be placed from the marks drawn in earlier practice exercises.


A) Starting Position -

1. Place the feet on the marks for the Starting Position.

2. Squat about half way down. Lean slightly forward at the waist with hands on hips. The weight is on the toes.


B) Movement -

1. Jump straight up from the starting position.

2. Try to land with the legs bent, and feet placed on the marks for the ending position.

3. Try not to lean forward on landing, instead, think "Hips between Heels."

4. Move the feet back to the starting position and repeat.

KEY WORDS: 1. JUMP STRAIGHT UP. 2. HIPS BETWEEN HEELS. 3. QUICK FEET.


C) Practice -

3 sets of 10 reps.


Five: Arm Action at the Top of the Pull


This action s very close to the Snatch Grip Upright Row. If this exercise has not been mastered follow the instructions below.


A) Starting Position -

1. With a Snatch grip, hold the bar in front of you.


B) The Exercise -

1. Lift the elbows, raising the weight along the body. This closeness to the body is very important in any type of lifting.

2. Pull all the way to the chin and return to the starting position. Try to keep the elbows pointing upward.

KEY WORDS: 1. LIFT THE ELBOWS. 2. GET ELBOWS OVER WRISTS. 3. KEEP BAR CLOSE TO THE BODY. 4. CURL THE WRISTS AT THE TOP. 5. ELBOWS UP. 6. SHOULDERS FORWARD AND UP.


C) Practice -

3 to 5 sets of 8 - 10 reps.


Six: The Hang Above the Knees Position


This is the basic or Power position for the Snatch. It must be mastered before moving on to the next exercise.


A) Position -

1. Place the feet on the Starting Position marks. Stand up. With a Snatch grip, hold the bar in front.

2. Raise the head, tighten the back.

3. Bend the legs at the knee.

4. Push the shoulders ahead of the bar. The bar should rest on the upper third of the thigh. The bodyweight should be at the front edge of the base of support. The lifter should still be able to wiggle his toes.

KEY WORDS: 1. BACK TIGHT. 2. SHOULDERS OVER THE BAR. 3. BEND AT THE HIPS AND THE KNEES, BUTT TIGHT.

B) Practice -

Assume the position at least 10 times.


Seven: Jumps from the Hang Above the Knees Position


This exercise teaches the explosive movement of the hips and back in the Snatch.


A) Starting Position -

1. The Hang Above the Knees Position.


B) The Movement -

1. Jump up, by driving the hips explosively upward and forward.

2. The bar should stay close to the body during the jump. If it is flying out away from the body, then the shoulders are being thrown back. The arms should be kept straight and relaxed, the shoulders flexed forward.

3. For work on footwork, try to land with the feet in the ending position.

KEY WORDS: 1. JUMP STRAIGHT UP. 2. DON'T THROW THE SHOULDERS BACK. 3. SHOULDERS FORWARD.


C) Practice -

3 sets of 5 reps.


Eight: Power Snatch from the Hang Above the Knees


This exercise ties together all the actions learned thus far. Review Parts IV and V to get the idea where this fits into the whole lift. Start SLOWLY to put together all the ideas you've learned. It's really important that the athlete develops a fluid motion. Make corrections to the gross errors only at first. Emphasize the smooth, flowing motion of the power snatch.


A) Starting Position - 

1. The Hang Above the Knee Position.


B) The Lift - 

1. JUMP -- Drive the hips forward and up as practiced in the last exercise. Go up on the toes, but don't leave the ground. 

2. LIFT THE ELBOWS -- Do the Upright Rowing motion. Keep the bar close to the body.

3. MOVE UNDER THE BAR -- As the bar reaches its highest point, rotate the elbows under the bar and bend the knees. As the movement gets faster this move is combined with the shifting of the feet to the ending foot position. 

4. PRESS -- Finish the lift by pressing on the bar just like in the Press Behind the Neck.

KEY WORD: JUMP. 2. SPEED. 3. SNAP. 4. KEEP THE BAR MOVING UPWARD. 5. CURL THE WRISTS. 6. POP AT THE TOP. 7. LIFT THE ELBOWS.


C) Practice -

3 to 5 sets of 3 - 5 reps.


Nine: Power Snatch from the Hang Below the Knees


In this exercise the bar is moved even closer to the floor at the start. Review Parts III through VI. The aim of this exercise is to teach how to move the bar from below the knees, through the power position, and finish the lift.


A) Starting Position -

1. Assume the starting position, learned in the second exercise.

2. Stand erect with the bar.

3. Bend the knees and bend forward at the hips so the bar hangs below the knees.


B) The Exercise -

1. Start the bar moving by pushing down with the feet.

2. Shift the shoulders upward and back, while still keeping them forward of the bar.

3. Continue to raise the shoulders while moving the hips forward into the scoop position. During the whole movement keep your weight forward toward the toes.

4. Once in the power position, finish the lift as before.

KEY WORDS: 1.BEND AT THE KNEES AND HIPS TO GET INTO THE STARTING POSITION. 2. START THE BAR WITH A PUSH OF THE FEET. 3. KEEP THE SHOULDERS OVER THE BAR AS LONG AS POSSIBLE. 4. SPEED. 5. JUMP. 6. KEEP THE BAR MOVING UPWARD. 7. POP AT THE TOP.


C) Practice -

3 to 5 sets of 3 - 5 reps.


Ten: The Power Snatch


Work from the floor is done last so that the proper use of the arms is learned first. Review Parts I through VI. The goal when working from the floor is to start the bar smoothly using leg and hip power.


A) Starting Position -

1. Use the position that was learned in the first exercise.


B) The Exercise  -

1. After getting into a comfortable starting position, push down on the floor with the feet to start the bar moving.

2. Lock the back so that its angle does not change while the bar travels to knee height.

3. The shoulders and hips should go up at the same speed.

4. Keep the arms relaxed and straight, elbows out.

5. Complete the lift from the knees as done before.

KEY WORDS: 1. BACK TIGHT. 2. PUSH FEET THROUGH THE FLOOR. 3. SHOULDERS OVER THE BAR. 4. HIPS AND SHOULDERS UP AT SAME SPEED. 5. CURL THE WRISTS TOWARD THE BODY.


C) Practice -

As a training exercise do 3 to 5 sets of 3 - 5 reps. As in the other exercises, work on blending all the ideas together. Concentrate on speed and the correction of the gross errors at first.


Now, moving on to the Full Squat Snatch . . .

Once the lifter can do the Power Snatch correctly, it's time to work on the full Squat Snatch. If the lifter has been doing the Low Position work (ex. 2), he's already been introduced to the low position. If you have done your job as a coach, the lifter will know that all he has to do is to bend the legs a little more and go into the bottom position. One point to stress is that there is NO difference in the pull for the Squat Snatch from that of the Power Snatch. THE ONLY DIFFERENCE IS THE DEPTH OF THE SQUAT.


Eleven: Drop Snatch


This exercise works footwork and gives the athlete the idea of pushing the body under the bar as he squats. Review Parts VI for details.


Starting Position -

1. Place the bar across the back. Take up a Snatch grip as in the Press Behind the Neck.

2. Place the feet on the marks or the start of the pull.


The Movement -

1. Bend the legs slightly and drive the bar upward. Go up on the toes.

2. Jump the feet to the foot position for the finish of the lift (Overhead Squat position).

3. Push the body down into the low squat, using the arms.. Remember to put the hips between the heels.

KEY WORDS: 1. BACK TIGHT. 2. PUSH UP AND OUT. 3. USE THE ARMS TO PUSH THE BODY DOWN. 4. CHEST OUT. 5. STRETCH THE BAR. 6. REACH.


Sets and Reps -

5 sets of 3 reps.


12: Going Under the Bar Exercise


This exercise teaches the athlete the timing necessary to complete the pull and to catch the bar in the low squat. Very light weights are used in this exercise with an emphasis on speed. Review Parts V and VI.


Starting Position -

1. Place the feet in the starting position for the pull.

2. Take the proper grip on the bar.

3. Stand erect with the bar.


The Movement -

1. Do two shoulder shrugs (slow). Concentrate on the contraction of the trapezius muscles.

2. On a third shrug (fast), quickly lift the elbows and go up on the toes.

3. Shift the feet to the low squat position.

4. Rotate the elbows and press the body into the low position.

5. Numbers 2, 3, and 4 are done in rapid succession.

KEY WORDS: 1. SHRUG. 2. EXTEND. 3. SNAP THE BODY UNDER THE BAR. 4. FIND THE "ZERO GRAVITY POINT". 5. MEET THE BAR. 6. SPEED. 7. KEEP THE BAR CLOSE. 8. CURL THE WRIST.


Sets and Reps -

5 sets of 3 reps (3 shrugs and a squat count as one rep).


Thirteen: The Squat Snatch


After the lifter has mastered all the previous exercises, he is ready to do the Full Snatch. Again, speed and flow of motion are the most important items. The coach should correct gross errors first. You can ignore some of the finer points while the athlete develops the speed and flow of the motion, and then go back and correct them in due time without any problems.


NEXT: TEACHING THE CLEAN AND JERK.


Thursday, October 8, 2015

U.S. Weightlifting Federation Coaching Manual: Technique Part Four


SECTION III:  TEACHING THE LIFTS 


Preparation of the Athlete's Body

Good technique depends on three items:

FLEXIBILITY 
BASIC MUSCULAR STRENGTH
EXPLOSIVENESS

If the athlete is not flexible, he won't be able to get into the most efficient positions. If he lacks basic muscle strength in the key areas he won't be strong enough to hold proper positions. For example, if the erectors aren't strong, the lifter will round his back instead of keeping it rigid. And, if he's not explosive, he won't move the bar with the proper speed. Therefore, before starting to teach technique the coach must evaluate these three items, and if the athlete is deficient, spend initial workouts improving flexibility, basic muscular strength, and explosiveness.


Improving Flexibility: Flexibility Evaluation

The flexibility tests which are recommended can be an important facet of the coach's evaluation process. These tests are the Sit and Reach (trunk flexion), Trunk Extension, Ankle Flexion and Extension, and Shoulder Elevation. Through the use of these tests, a coach can determine the flexibility of his athletes in the areas crucial to efficient lifting, that is, the ankles, hips, back, hamstrings, and shoulders. Each test is listed with a description and the equipment needed. Norms for these tests related to various age groups will be shown. Athletes should score Above Average to be considered to have good flexibility.


Test Number One

Sit and Reach:

Equipment - 

yardstick, bench or other flat surface for subject to place the feet against. (See Illustration).


Description of Test:

1) Test apparatus - a yardstick is placed to that 9 inches is at the level of the feet and the zero level of the scale is toward the subject.

2) Subject's position - legs together, feet flat against test apparatus, knees down (note: the knees must stay down throughout the test). Shoes must be removed.

3) Arms are extended forward across the yardstick with the palms down and thumbs together.

4) Subject reaches forward along the measuring scale two times as a warmup and holds the position of maximum reach on the third trial. This position must be held for one second by the fingertips of BOTH hands.

5) The tester should record the number (inches) that the subject reaches on the third try.


Test Number Two

Trunk Extension:

Equipment - yardstick to measure; yardstick.

Description of test: 


1) Subject's position: lying prone on a mat or table with hips held stable by assistant; hands locked behind neck.

2) Head and chest are lifted upward and backward as far as possible (Note: legs are held straight and flat throughout the test).

3) The tester should record the distance from floor to chin (inches).


Test Number Three

Shoulder Evaluation:

Equipment - yardstick to measure; yardstick or broomstick for subject to hold. 

Description of test:


1) Subject's position: lying prone on mat or table with chin down; arms locked straight over head; stick held with palms down and shoulder width grip.

2) Raise the stick as high as possible while keeping the arms straight and chin down throughout.

3) The tester should record the distance from the mat to the stick (inches).

4) Precautions: 

a) Keep the measurement in a vertical plane.
b) Be careful not to allow the subject to "dislocate" the shoulders and thus gain additional measure.


Test Number Four

Ankle Extension and Ankle Flexion:

Equipment - pencil; paper ; protractor.

Description of Test: 


1) Test set-up: Tape a large piece of paper to the wall either at floor level or table top level.

2) Subject's position: (to test right ankle) - 
sit with right hip and extended right leg against wall; knee stays down throughout the test; shoes must be removed.

3) The tester traces the TOP of the foot in maximum extended position (toes pointed) with a pencil held perfectly horizontal. Repeat the procedure with the foot in maximum flexed position (toes back).

4) When the paper is removed, a protractor is used to measure the angle (degrees) between the two positions.

5) Repeat steps 2 - 4 for the left ankle.


Click to ENLARGE


STRETCHING AND FLEXIBILITY EXERCISES:

Description of Flexibility Exercises


1) Sit on the floor, extend the arms overhead, palms forward. A partner then forces the arms backward. Repeat 5 - 10 times.

2) Stand facing away from a ladder, horizontal bar, or partner holding the warmup stick. Grab the rungs at the top and work your way down making a bridge. If you are working with a horizontal bar or a partner have the bar moved downward as you loosen up. Repeat 5 - 10 times.

3) Stand facing the ladder, bar, or partner. Lean forward and grab the rung or bar. Keeping the arms straight continue to bend over as far as you can go. Repeat 5 - 10 times. 

4) Stand with your legs apart. Place the warmup stick high on your back and hold it in the crook of the elbows. Bend over trying to touch your face to your knees. Don't bend the knees. Repeat 5 - 10 times.

5) Stand with your legs apart and your back close to the ladder, bar or partner. Reach back and grasp the bar at shoulder level. Arch your body by lifting the hips forward and straightening the arms. Repeat 5 times.

6) Lie on your stomach, feet together. Reach back and have your partner help arch your body. Repeat 5 times.

7) Place your toes on small block of wood. Hands on hips. Go up and down on your toes. Repeat 10 times.

8) Place your feet apart, toes pointed outward. Squat down slightly, lean forward and rest your hands on your knees. Make circular motions with your knees to the inside and outside using your hands to apply pressure. Repeat 10 times.

9) The same as exercise 8, but with the feet together.

10) Take an overhand grip on the ends of the warmup bar (the narrower the grip the harder the exercise). Without bending the arms, make an arc by lowering the bar behind the back and returning to the starting position. Repeat 3 - 5 times.

11) Lean forward, legs apart. Bring your arms up behind you and grasp your hands together. With your partner's help bend over farther while he forces your arms back and up. Repeat 5 - 10 times.

12) Bend forward, hands behind the head, elbows pointed to the sides. Rotate the trunk to the right and left. Repeat 5 - 6 times to each side.

13) Stand with the barbell at waist level. Bend over until the barbell touches the ground (don't bend the knees), return to the starting position. Repeat 5 - 6 times.

14) Bend backwards with or without the help of a partner, making a bridge. Repeat 3 times.

15) Lie on your back, legs together, arms to the sides. Lift the legs and touch the toes behind the head, return to the starting position. Repeat 3 - 5 times.

NOTE: All of these exercises should be repeated 2 or 3 times for the reps listed during your warmup.


Improving Muscular Strength


Basic Weight Training Exercises for Preparation

The following group of exercises have been chosen for two reasons. First, they develop the major muscles used in lifting. Second, their performance is a key in the learning of technique. It's recommended that all beginning juniors do these exercises for 6 - 8 weeks before starting full-scale technique training.


Wide Grip Press Behind the Neck

This exercise is an excellent arm/shoulder developer. Also, it's an outstanding way to learn the overhead position of the Power Snatch.

A) The Grip - 
See Snatch grip width methods, page 8.

B) The Starting Position - 
1. Place the bar on the back, using the wide grip just determined.
2. Rotate the elbows downward and cock the wrists back, if possible.
3. Raise the chest.

C) The Exercise - 
Press the bar overhead. Concentrate on rotating the shoulders back. Lock the elbows tight at the finish of the movement. Keep the wrists back.

D) Sets and Reps - 
3 to 5 sets of 6 - 10 reps.


Upright Rowing

This exercise is another arm and shoulder developer. It teaches the correct way to pull the bar with the arms in the Clean and the Snatch.

A) The Starting Position - 
1. Hold he bar with a narrow grip in front of you.
2. This grip can be varied in later workouts to the Snatch width.

B) The Exercise - 
1. Lift the elbows, raising the weight along the body. This closeness to the body is very important in any type of lifting.

C) Sets and Reps - 
3 to 5 sets of 8 - 10 reps.


Bench Press

This popular exercise is also a good upper body developer.

A) The Starting Position - 
1. Grip the bar with at least a shoulder width grip. This grip can be varied in later workouts.
2. Keep back flat on the bench. Feet flat on the floor.

B) The Exercise - 
1. Lower the bar to the chest.
2. Pause at chest or get slight bounce. Press to starting position. Lock arms tight at end of each rep.

C) Sets and Reps - 
3 to 6 sets of 3 - 10 reps.


Rowing

This is a good arm and back developer. It also works the low back and hip stabilizing muscles used in the Power Clean and Power Snatch.

A) The Starting Position - 
1. Grip the bar. Grip can vary from very close to Snatch width.
2. Stand up with the bar.
3. Bend knees slightly and bend at the hips until the bar is just below the knees.
4. Maintain a rigid torso with the shoulders ahead of the bar.

B) The Exercise-
1. Pull the bar toward the chest using ONLY the arms.
2. DO NOT change the position of the back and legs.
3. Lower the bar to the starting position.

C) Sets and Reps
2 to 4 sets of 6 - 10 reps.


Good Mornings

This exercise develops the muscles of the low back, hips, and hamstrings.

A) The Starting Position - 
1. Place the bar high on the back.
2. Padding may be placed on the bar to make the exercise more comfortable.

B) The Exercise - 
1. Bend over as in touching the toes. The knees should be slightly bent. Round the back as much as possible. Try to put the head between the knees.
2. Start the upward movement by rolling the head up and back. As the head goes up, start tightening the back at the top and gradually work down the spine until the whole back is rigid. At that point continue up to the standing position.


C) Sets and Reps - 
3 to 5 sets of 6 - 10 reps.


Situps

This is the standard abdominal development exercise and should be used by all ahtletes.


A) The Starting Position - 
1. Lying down, knees bent, feet secured by a partner or barbell.
2. Hands or weight held behind the head.

B) The Exercise - 
1. Curl the trunk to the seated position.
2. Return to the start.

C. Sets and Reps - 
2 sets of 25 - 50 reps, FREE
2 sets of 10 - 20 reps WEIGHTED


Back Squats

This is the base exercise of any weight training routine.

A) Starting Position - 
1. The bar is placed high on the back.
2. The feet are placed a comfortable distance apart.
3. The chest is up and the back is tight.

B) The Exercise - 
1. Bend the legs, try to place the hips between the heels, and keep the trunk as straight as possible while going down.
2. Recover by raising the hips. As the bar starts moving upward bring the hips forward.

C) Sets and Reps - 
5 to 8 sets of 2 - 10 reps.


Front Squat

This is another excellent lower body exercise and should be substituted for Back Squats one time a week. 

A) The Starting Position - 
1. Place the bar on the chest. Raise the elbows so that the bar rests on the deltoids. If this is done correctly, the arms do not support the weight, the shoulders do.
2. Place the feet in a comfortable position. Keep the chest up and the back tight.

B) The Exercise - 
1. Bend the legs, trying to place the hips between the heels.
2. Don't allow the elbows to vary from their starting position. This will keep the body as straight as possible.
3. Recover by raising the hips. As the bar moves up, the hips will come forward.

C) Sets and Reps -
5 to 8 sets of 2 - 10 reps.


Stiff Legged Deadlift

This is a hip and hamstring developer. It is not a competitive lift like the regular Deadlift. Here, exercise TECHNIQUE is more important for development than the amount of weight lifted. 

A) The Starting Position - 
1. Stand over the bar with the feet together.
2. Lock the knees, straighten and tighten the back, bend over at the waist, and grab the bar with a shoulder width grip.

B) The Exercise - 
1. Try to keep the knees locked and back straight. Stand up by raising the shoulders until fully upright.
2. Lower to the starting position without rounding the back.

C) Sets and Reps - 
2 to 3 sets of 3 - 10 reps.


Improving Explosiveness

This subject will be covered in great depth in a future section of this manual. In general, running, jumping, and other similar activities improve the athlete's explosiveness. Plyometric training is especially valuable.   

Technique Teaching Theory

In the first two sections of this book we've tried to prepare you technically to teach the Olympic lifts. This information is to give you a deeper understanding of how and why the barbell is lifted the way it is. Now it's time to show you how to convert this technical knowledge to useful exercises that the athlete can understand easily. The athlete does not need this technical information. He does need to know how the barbell and his body should feel during the lift. In teaching him, it's important that you allow him to experience those feelings he needs to properly learn the lifts. For that reason, the teaching method that we are giving to you relies heavily on your ability to make sure that the athlete learns everything he can from each teaching exercise. We'll give you tips on key words and suggestions you can give to the athlete to improve his performance. It's also important to get feedback from the athlete, so we suggest you ask him questions like, "How did that feel?" or "Where was the bar on that last rep?" Make him tell you what his body is feeling and when he has the motion down correctly make sure he knows it. Our goal is to have coaches who understand WHY the bar is lifted the way it is, and athletes who know HOW the bar is lifted. For the coach, this means several hours studying this manual and other books. For the athlete, it's hours in the gym getting the feel of the body and bar. The final result is an athlete who does the Snatch and the Clean and Jerk with perfect technique, without thought about the technical aspects, but with the firm idea of how the bar should feel in a perfect lift. 


That being understood, let's move on.

NEXT: TEACHING THE SNATCH.


Blog Archive